How to migrate Google Workspace backup data to a new storage location.
In some cases, you may want to move your Google Workspace backups to a different location, especially when the current backup storage is nearly full.
Note:
Depending on the amount of data being backed up, data migration can take a considerable amount of time. Please note no new backups will take place until all data has been migrated to the new location.
If it is absolutely necessary to perform a backup, the data migration must be cancelled and started again from the beginning after the backup is finished.
Starting from version 4.7.5, CubeBackup for Google Workspace supports migrating to a new storage location directly through the web console. If you'd like to initiate a migration process in CubeBackup, please ensure that you have upgraded to the latest version of CubeBackup first, and then follow the instructions below to set up your data migration.
Start the migration
Log in to the CubeBackup for Google Workspace web console as a system administrator.
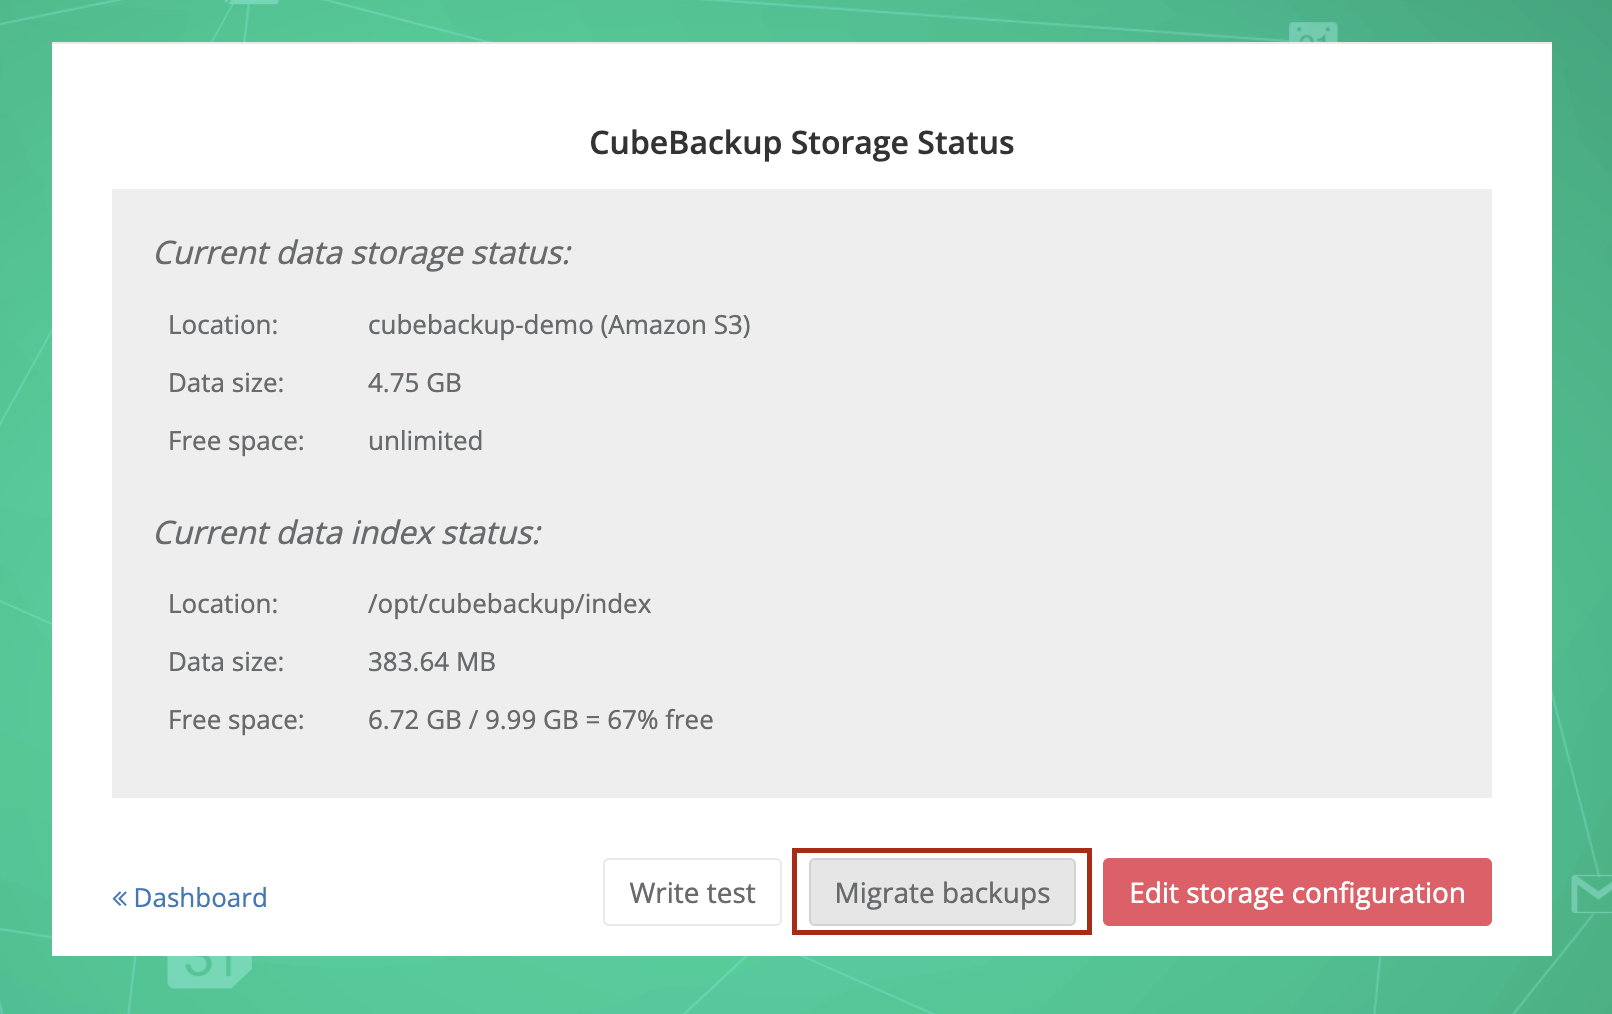
On the OVERVIEW page of the CubeBackup web console, find the Storage status section at the bottom right, and click the gear icon to open the update wizard. Press the Migrate backups button.
The CubeBackup Migration wizard will pop up. Click Next to begin the configuration.
Note: This operation will stop the current backup or restore process.
Step 1. Authorize the migration
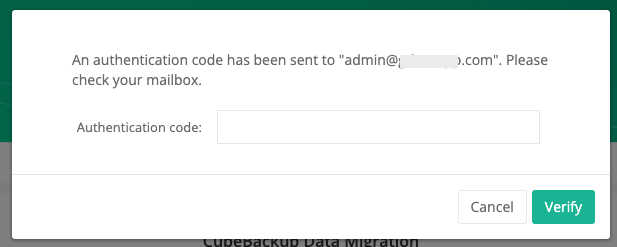
As a safety precaution, an authentication code will be emailed to you. Please type in the code to continue.
Step 2. Set up new data storage location
Step 2 allows you to set up the new storage location. CubeBackup for Google Workspace supports migrating to a local disk, NAS/SAN, Amazon S3, Google Cloud storage, Microsoft Azure Blob storage, and Amazon S3-compatible storage. Please click the corresponding tab below for detailed information on each of these options.
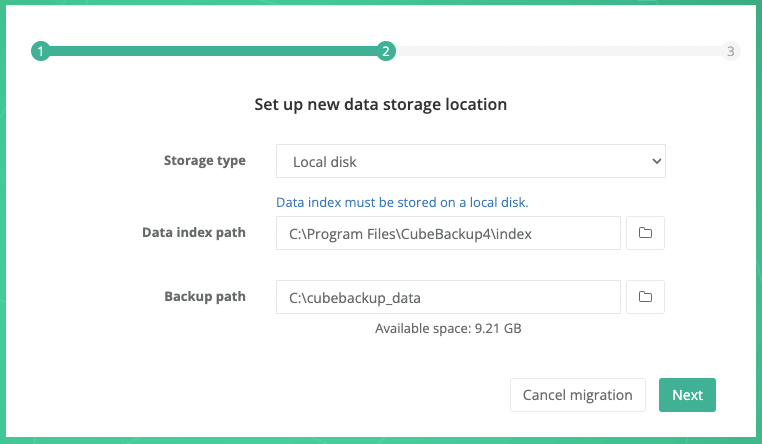
Storage type: Select Local disk from the dropdown list.
Data index path: For performance reasons, data index must be stored on a local disk. In most cases, there is no need to specify a new path for the data index.
Note: Data index is the metadata for the backups, and its accessing speed is crucially important for the performance of the backups. We strongly recommend that you store the data index on a local SSD. See What is the data index for more information.
Backup path: Select a local directory for the Google Workspace backup data.
Note: CubeBackup on Linux runs as the "cbuser" and needs full permissions to read, write and execute in the storage directory. If the storage destination is a subdirectory, please also ensure that "cbuser" has at least "x" permission to all levels of its parent directory.
When all information has been entered, click the Next button.
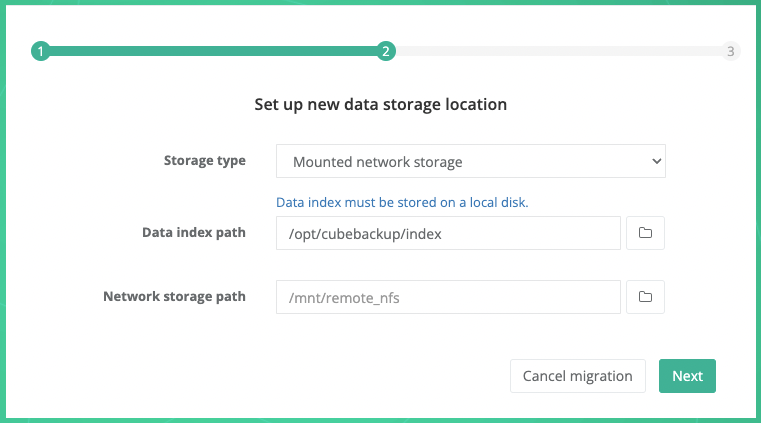
Storage type: Select Mounted network storage from the dropdown list.
Data index path: For performance reasons, data index must be stored on a local disk. In most cases, there is no need to specify a new path for the data index.
Note: Data index is the metadata for the backups, and its accessing speed is crucially important for the performance of the backups. We strongly recommend that you store the data index on a local SSD. See What is the data index for more information.
Network storage path: Select a mounted network location as the backup storage.
Note: CubeBackup on Linux runs as the "cbuser" and needs full permissions to read, write and execute in the storage directory. If the storage destination is a subdirectory, please also ensure that "cbuser" has at least "x" permission to all levels of its parent directory.
When all information has been entered, click the Next button.
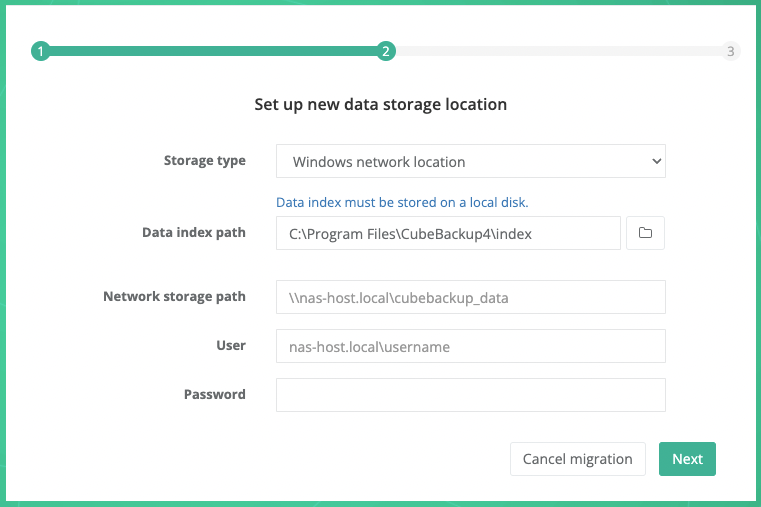
Storage type: Select Windows network location from the dropdown list.
Data index path: For performance reasons, data index must be stored on a local disk. In most cases, there is no need to specify a new path for the data index.
Note: Data index is the metadata for the backups, and its accessing speed is crucially important for the performance of the backups. We strongly recommend that you store the data index on a local SSD. See What is the data index for more information.
Network storage path: If CubeBackup is installed on a Windows operating system using network storage, the network storage path and access credentials are required in this step.
Manually enter the UNC path for the remote storage, e.g., \\NAS-HOSTNAME\gsuite_backup, or \\192.168.1.123\gsuite_backup. Generally, the hostname is preferred over IP addresses, especially in an Active Directory domain environment.
Notes: Network resource drive letter mapping is not currently supported. Please use UNC paths (\\NAS-HOSTNAME\backup\gsuite) instead of mapped paths (Z:\gsuite).
User and password: The username and password to access the network storage are required.
- For Windows networks using Active Directory, the preferred user name format is <DomainName>\<UserName>. For example: cubebackup\smith ( [email protected] is not supported).
- For Windows networks organized by workgroup, or if the network storage is located outside of your active directory, the format should be <NASHostName>\<UserName>. For example: backup_nas\smith.
Why are a username and password required?
CubeBackup runs as a service using the system default local service account, which does not have rights to access network resources. This is by design in Windows. In order for CubeBackup to access network storage, a username and password must be supplied.
When all information has been entered, click the Next button.
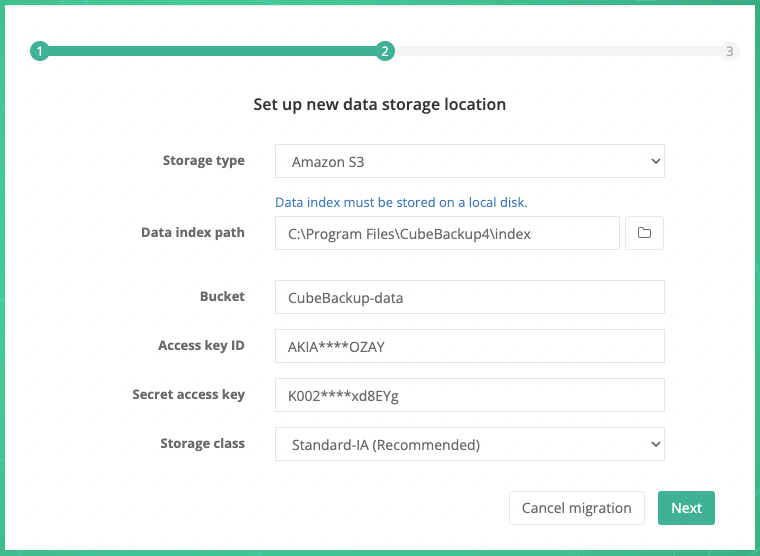
Storage type: Select Amazon S3 from the dropdown list.
Data index path: Select a local directory to store metadata for your backup.
Note: Data index is the metadata for the backups, and its accessing speed is crucially important for the performance of the backups. We strongly recommend that you store the data index on a local SSD. See What is the data index for more information.
Bucket: The unique name of your S3 storage bucket.
Access key ID: The AWS IAM access key ID to authorize access to data in your S3 bucket.
Secret access key: The secret of your AWS IAM access key.
Please follow the instructions below to create and configure a private Amazon S3 bucket for your backup data.
- Create an AWS account
If your company has never used Amazon Web Services (AWS) before, you will need to create an AWS account. Please visit Amazon Web Services (AWS) , click the Create an AWS Account button, and follow the instructions.
If you already have an AWS account, you can sign in directly using your account.
- Create an Amazon S3 bucket
Amazon S3 (Amazon Simple Storage Service) is one of the most-widely used cloud storage services in the world. It has been proven to be secure, cost-effective, and reliable.
To create your S3 bucket for Google Workspace backup data, please follow the brief instructions below.
- Open the Amazon S3 console using an AWS account.
- Click Create bucket.
- On the Create bucket page, enter a valid and unique Bucket Name.
- Leave the other available options as they are.
Note:
1. Since CubeBackup already has a version control and will overwrite index files frequently, enabling Bucket Versioning or Advanced settings > Object Lock in the S3 bucket will result in unnecessary file duplication and cost. We recommend leaving these two features disabled.
2. Depending on your company policies, you can change the other default configurations (Block Public Access, Default encryption, etc.). These options will not affect the functioning of CubeBackup. - Ensure that your S3 settings are correct, then click Create bucket.
- Go back to the CubeBackup setup wizard and enter the name of this newly-created bucket.
- Open the Amazon S3 console using an AWS account.
- Create an IAM account
AWS IAM (Identity and Access Management) is a web service that helps you securely control access to AWS resources. Follow the brief instructions below to create an IAM account for CubeBackup and grant access to your S3 bucket.
- Open the AWS IAM console .
- Select Users from the left panel and click Create user.
- Enter a valid User name (e.g. CubeBackup-S3), leave the option "Provide user access to the AWS Management Console" unchecked, and click Next.
- In the Set permissions page, Select Attach policies directly under Permissions options.
- Search for the AmazonS3FullAccess policy and check the box in front of it. You can leave the Set permissions boundary option as default.
Tip: Instead of using the "AmazonS3FullAccess" policy, you can also create an IAM account with permissions to the specific S3 bucket for CubeBackup only .
- Click Next, review your IAM user settings, then click Create user.
- Click the name of the newly-created user in the list.
- Choose the Security credentials tab on the user detail page. In the Access keys section, click Create access key.
- On the Access key best practices & alternatives page, choose Application running outside AWS, then click Next.
- Set a description tag value for the access key if you wish. Then click Create access key.
- On the Retrieve access keys page, click Show to reveal the value of your secret access key. Copy the Access key and Secret access key values to the corresponding textboxes in the CubeBackup setup wizard.
Storage class: Select an Amazon S3 storage class for the backup data. Standard-IA or One Zone-IA is recommended.
For more information about Amazon S3 storage classes, please visit AWS Storage classes . You can find the pricing details for the different S3 storage classes at S3 pricing .
When all information has been entered, click the Next button.

Storage type: Select Google Cloud storage from the dropdown list.
Data index path: Select a local directory to store metadata for your backup.
Note: Since the data index contains the metadata for the backups, access speed is crucially important for the performance of CubeBackup. We strongly recommend that you store the data index on a local SSD. See What is the data index for more information.
Bucket: Before you can backup data to Google Cloud storage, you will first need to create and configure a private Google Cloud Storage bucket.
Storage class: The storage class for the backup data. Coldline is recommended. For more information about Google Cloud storage classes, please visit Storage classes . You can find the pricing details for the different Google Cloud storage classes at Cloud Storage Pricing .
Please follow the detailed instructions below to configure your Google Cloud Storage bucket.
Google Cloud Platform (GCP) uses projects to organize a group of Google Cloud resources. In this new project, you will create a private storage bucket, and manage permissions for it.
Log in to Google Cloud Platform (GCP) .
Tip: We recommend using a Google Workspace admin account so that you can take steps to protect this project from accidental changes that could disrupt future backups.
Go to the Projects page in the Google Cloud Console.
Tip: This page can be opened by either clicking the above link or selecting IAM & admin > Manage resources in the navigation menu. The navigation menu slides out from the left of the screen when you click the
 icon in the upper left corner of the page.
 Click + Create Project, enter a valid Project name, confirm the Organization and Location, then click Create.
The creation of the project may take one or two minutes. After the project has been created, click the newly created project in the Notifications dialog to make it the active project in your dashboard (you can also select your newly created project in the project drop-down list at the top of the page to make it the active project).

For a newly-created project, you will need to enable billing before using Google Cloud Storage. Select the Billing in the navigation menu and follow the prompts to LINK a BILLING ACCOUNT or MANAGE BILLING ACCOUNTS.
- Select Cloud Storage > Buckets from the navigation menu.
- In the Buckets page, click + Create.
- In the Create a bucket page, input a valid name for your bucket, and click Continue.
- Choose where to store your data. Choose a Location type for the bucket, then select a location for the bucket and click Continue.
Tips:
1. CubeBackup is fully compatible with all location types. Depending on the requirements of your organization, you may choose to store backups in single, dual or multi-regions. Details about region plans may be found here
2. Please select the location based on the security & privacy policy of your organization. For example, EU organizations may need to select regions located in Europe to be in accordance with GDPR.
3. If CubeBackup is running on a Google Compute Engine VM, we recommend selecting a bucket location in the same region as your Google Compute Engine VM. - Choose a storage class for your data. We recommend selecting Set a default class / Coldline as the default storage class for the backup data, then click Continue.
- Choose how to control access to objects. Leave the Enforce public access prevention on this bucket option checked, choose the default option Uniform as the Access control type, and click Continue.
- Choose how to protect object data. Leave the options as default for this section.
Note: Since CubeBackup constantly overwrites the SQLite files during each backup, enabling the Object versioning or Retention policy would lead to unnecessary file duplication and extra costs.
- Click Create.
- If prompted with the 'Public access will be prevented' notification, please leave the Enforce public access prevention on this bucket option checked as default and click Confirm.
- Go back to the CubeBackup setup wizard and enter the name of this newly created bucket.
Before clicking the Next button on the CubeBackup wizard, be sure to follow the steps below to assign the service account permissions to access the newly created bucket.
- Go to the IAM page in the Google Cloud Console.
-
In the project dropdown menu at the top of the page, make sure to select the project where your Google Cloud storage bucket is located, and make it the active project.
- Click the + Grant access button. A Grant access to ... dialog will slide out from the right.
- Copy the email address of this newly-created service account. You can find it by opening the service account key file in a text editor and copying the value of the
"client_email"field. - Paste the service account email address into the New principles textbox.
- In the Select a role field, search for the Storage Object User and select it as the assigned role.
- Click Save.
Go back to the CubeBackup wizard and check if all information has been entered, and then click Next.
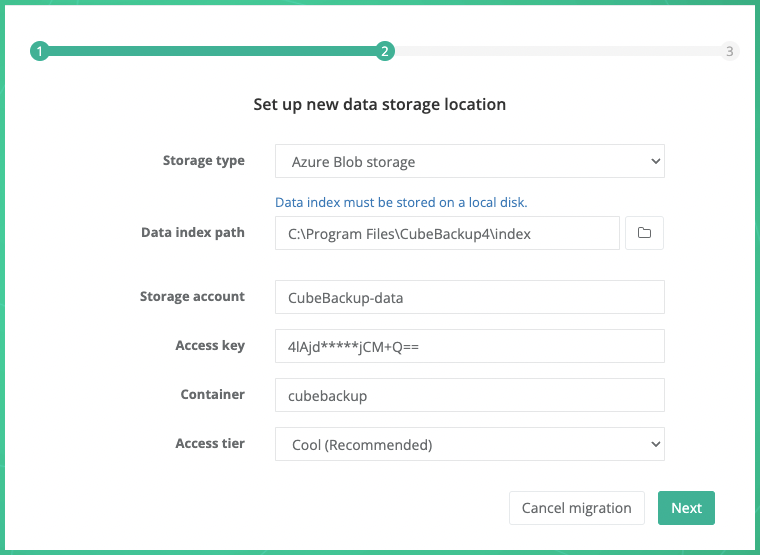
Storage type: Select Azure Blob storage from the dropdown list.
Data index path: Select a local directory to store metadata for your backup.
Note: Since the data index contains the metadata for the backups, access speed is crucially important for the performance of CubeBackup. We strongly recommend that you store the data index on a local SSD. See What is the data index for more information.
Storage account: Your Azure storage account.
Access key: The access key to your storage account.
Container: The container created in your Azure storage account.
For more information about Azure Blob storage, storage account, and container, please visit Introduction to Azure Blob storage .
Access tier: The Access tier for Azure Blob Storage. Cool is recommended.
For more information about Azure Blob Storage Access tiers, see this doc . You can find the pricing details for the different Azure Storage Cloud access tiers classes from here .
Please follow the instructions below or watch the demo to create a Storage account and a Container for Azure Blob Storage.
Create a storage account
- Log in to the Microsoft Azure Portal using an Azure account with an active subscription. If you do not have an Azure account, sign up to get a new account.
Select Storage Accounts from the left panel and click + Create.
Tip: If you are led back to a welcome page for Azure, it may be because you don't have an active Azure service subscription. In this case, click the Start button below 'Start with an Azure free trial' and follow the instructions to sign up for an Azure subscription.
On the Basics tab, select the Subscription and Resource group in which you'd like to create the storage account.
Next, enter a valid and unique name for your storage account.
Select a Region for your storage account or simply use the default one.
Note: Please select the location based on the security & privacy policy of your organizations. For example, for EU organizations, you may need to select Europe to be in accordance with GDPR.
Select the Performance tier. Standard is recommended.
Choose a Redundancy policy to specify how the data in your Azure Storage account is replicated. Zone-redundant storage (ZRS) is recommended. For more information about replication strategies, see Azure Storage redundancy .
On the Data protection tab, uncheck Enable soft delete for blobs. Since CubeBackup constantly overwrites the SQLite files during each backup, enabling this option would lead to unnecessary file duplication and extra costs.
Additional options are available under Advanced, Networking, Data protection and Tags, but these can be left as default.
Select the Review tab, review your storage account settings, and then click Create. The deployment should only take a few moments to complete.
Go back to the CubeBackup setup wizard and enter the name of this newly created storage account.
Get Access key
To authenticate CubeBackup's requests to your storage account, an Access key is required.- On the Home page, select "Storage Account" > [your newly created storage account]. Then in the detail page, select Access keys under Security + networking in the left panel.
- On the Access keys page, click Show beside the Key textbox for either key1 or key2.
- Copy the displayed access key and paste it into the Access key textbox in the CubeBackup configuration wizard.
Create a new container
- In the detail page of your newly created storage account, click Containers under Data storage from the left panel.
- On the containers page, click + Add container.
- Enter a valid Name and ensure the Public access level is Private (no anonymous access). You can leave the other Advanced settings as default.
- Click Create.
- Go back to the CubeBackup setup wizard and enter the name of this newly created container.
When all information has been entered in the configuration wizard, click the Next button.
CubeBackup supports Amazon S3 compatible storage, such as Wasabi and Backblaze B2 .
- To create a storage bucket on Wasabi Cloud Storage, please refer to backup Google Workspace data to Wasabi.
- To create a storage bucket on Backblaze B2 storage, please refer to backup Google Workspace data to Backblaze B2.
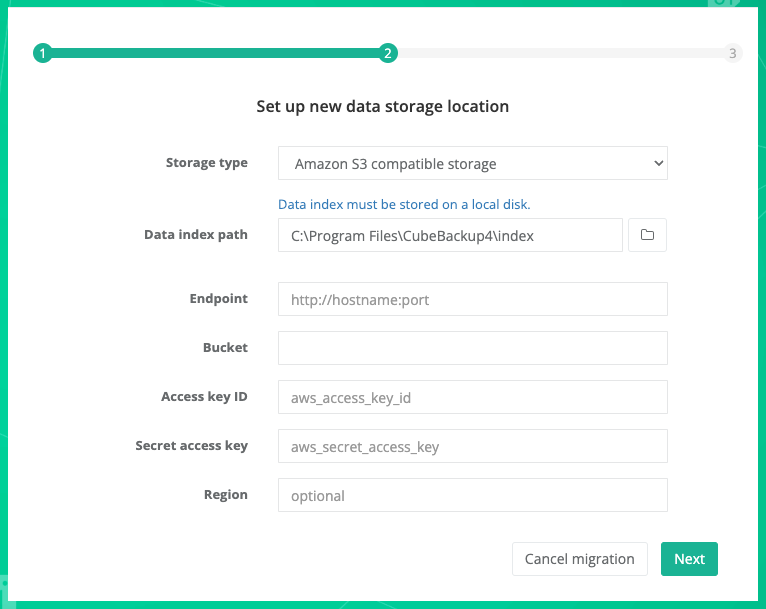
Storage type: Select Amazon S3 compatible storage from the dropdown list.
Data index path: For performance reasons, data index must be stored on a local disk. In most cases, there is no need to specify a new path for the data index.
Note: Data index is the metadata for the backups, and its accessing speed is crucially important for the performance of the backups. We strongly recommend that you store the data index on a local SSD. See What is the data index for more information.
Endpoint: The request URL for your storage bucket.
For Backblaze B2 and IDrive e2 users, please ensure that you prepend https:// to the endpoint address.
Bucket: Your S3 compatible storage bucket.
Access key ID: The key ID to access your S3 compatible storage.
Secret access key: The access key value to your S3 compatible storage.
Region: Certain very specific self-hosted S3 compatible storage may require you to manually enter the region. Wasabi and Backblaze users can ignore this section.
Step 3. Confirm new storage configuration
In Step 3, please carefully confirm the new storage details, and then click Start migration.
CubeBackup will begin copying your previous backup data to the new storage location. After the migration is complete, all subsequent backups will use the new storage location automatically.
Note: 1. If something should go wrong and the data migration were to fail, don't worry! All backup data and settings remain unchanged in the original location. CubeBackup will revert to the original location and settings. 2. Even after a successful data migration, the original backup data remains untouched for security reasons. Once you have confirmed that CubeBackup is functioning properly using the new location, you may manually remove the data in the old location at your convenience.
Monitor the migration
Once the migration has begun, it is safe to close the browser. The migration process will continue to run in the background. Depending on the amount of data being migrated, this process may take a considerable amount of time. You can monitor the progress of the migration at any time by reopening the web console.
NOTE: The migration progress is only visible to system administrators. Any other restricted admin accounts or individual users with restricted permissions are temporarily blocked from accessing the web console.
CubeBackup will automatically send a notification to your mailbox once the migration is successful, or in the event of a failure. You will need to log in to the web console to confirm the migration status. For a failed migration, you can either abort the entire process or retry the unfinished data.
NOTE: If the migration has failed due to errors, clicking the Retry button will retry all failed files and resume the migration from where it left off.
CubeBackup also keeps a detailed record of the migration status of each file. You can find the log file at <installation directory>/log/migration.log .
On Windows, the default installation directory is C:\Program Files\CubeBackup4\ .
On Linux, the default installation directory is /opt/cubebackup/.
Cancel the migration
CubeBackup will not resume its regular backups until the data migration is complete; however, there may be cases where an urgent backup or restoration process request arises, and it is necessary to perform the request before continuing the migration. Or perhaps you need to pause the current migration temporarily, or even switch to a different target storage and start from scratch again.
- If you are still in the configuration wizard and have not yet started the migration, you can simply move back to Step 2 and click Cancel migration.
If the migration process is already initiated, but you need to perform a backup or restoration in the web console immediately, you can use the Abort button to quit the current migration process.
Later, if you wish to resume the migration, please initialize a second migration to the same storage location. CubeBackup will automatically skip any unchanged files that have already been moved to the new location, and continue the migration from where you left off.
To switch to a different target storage location, you will need to click the Abort button, reopen the migration wizard <IP or domain name>/migrate, and initiate a completely new migration.