How to remove backups for a specific user or shared drive.
In some situations, you may wish to remove the backup data for a specific user or shared drive. Perhaps a user has left your organization, or you simply wish to free up space by removing a shared drive that is no longer needed.
Remove a specific user
CubeBackup for Google Workspace allows you to easily purge specific users from your backup set. Please follow the detailed instructions appropriate for your operating system.
Log into the backup server.
Be sure to stop the CubeBackup service before running this command:
Open a Command Prompt or Windows Powershell as Administrator and run the following command:"C:\Program Files\CubeBackup4\bin\cbsrv.exe" stop # in Command Prompt
& "C:\Program Files\CubeBackup4\bin\cbsrv.exe" stop # in Windows Powershell
Open a Windows Command Prompt or Powershell using an Administrator account. Run the cbackup purgeUser command in the <installation directory>\bin folder, and when prompted, double-check that this is the correct user to be deleted. Type "yes" to purge all backup data for that specific user.
"C:\Program Files\CubeBackup4\bin\cbackup.exe" purgeUser <user_email>Note:
(1) If the user has already been deleted in Google Workspace, you can choose to also remove him or her from the user list in CubeBackup. This will completely delete the user so it will no longer appear in the CubeBackup web console.
(2) To remove multiple users at the same time, you can create a batch file that includes the following command for each user to be removed:echo yes | "C:\Program Files\CubeBackup4\bin\cbackup.exe" purgeUser <user_email>(3) For multiple deleted users, if you wish to remove them thoroughly from the CubeBackup user list, please use the following command for each user:
(echo yes & echo yes) | "C:\Program Files\CubeBackup4\bin\cbackup.exe" purgeUser <user_email>This command confirms both prompts to ensure that the deleted user is fully purged from CubeBackup.
After running this command, you will need to start the CubeBackup service:
Open a Command Prompt or Windows Powershell as Administrator and run the following command:"C:\Program Files\CubeBackup4\bin\cbsrv.exe" start # in Command Prompt
& "C:\Program Files\CubeBackup4\bin\cbsrv.exe" start # in Windows Powershell
Now you can log into the CubeBackup console and see that:
- No files/messages are listed under the user's account on the RESTORE page.
- The statistical data on the OVERVIEW page has been refreshed to reflect the changes.
- The purged user has now been deselected from the SETTINGS > Users list and will not be included in future backups.
SSH into the backup server.
Before running this command, be sure to stop the CubeBackup service:
sudo /opt/cubebackup/bin/cbsrv stopRun the cbackup purgeUser command, recheck the user name, and type "yes" to purge all backup data for the specific user.
sudo -u cbuser /opt/cubebackup/bin/cbackup purgeUser <user_email>Note:
(1) This command requires special privileges and must be run by the cbuser account.
(2) If the user has already been deleted in Google Workspace, you can choose to also remove it from the user list in CubeBackup. This will completely delete the user so it will no longer appear in the CubeBackup web console.
(3) To remove multiple users at the same time, you can create a bash script that includes the following command for each user to be removed:yes | sudo -u cbuser /opt/cubebackup/bin/cbackup purgeUser <user_email>(4) For multiple deleted users, if you wish to remove them thoroughly from the CubeBackup user list, please use the following command for each user:
(echo yes; echo yes) | sudo -u cbuser /opt/cubebackup/bin/cbackup purgeUser <user_email>This command confirms both prompts to ensure that the deleted user is fully purged from CubeBackup.
After running this command, you will need to start the CubeBackup service.
sudo /opt/cubebackup/bin/cbsrv startNow you can log into the CubeBackup console and see that:
- No files/messages are listed under the user's account on the RESTORE page.
- The statistical data on the OVERVIEW page has been refreshed to reflect the changes.
- The purged user has now been deselected from the SETTINGS > Users list and will not be included in future backups.
Find the container id for CubeBackup:
docker ps -aSwitch to maintenance mode by running the following command:
docker exec <container_name_or_id> touch /cubebackup_maintenance && docker restart <container_name_or_id>Open the bash shell of the container:
docker exec -it <container_name_or_id> bashRun the cbackup purgeUser command in the docker container.
sudo -u cbuser /opt/cubebackup/bin/cbackup purgeUser <user_email>When prompted, type "yes" to confirm, and CubeBackup will delete the backup data for the specified user. Depending on the size of the user's data, this process may take quite a while.
Note: If the user has already been deleted in Google Workspace, you can choose to also remove it from the user list in CubeBackup. This will completely delete the user so it will no longer appear in the CubeBackup web console.
After the cbackup purgeUser command has successfully completed, type exit to exit the container and run the following command to quit maintenance mode:
docker exec <container_name_or_id> rm /cubebackup_maintenance && docker restart <container_name_or_id>Now you can log into the CubeBackup console and see that:
- No files/messages are listed under the user's account on the RESTORE page.
- The statistical data on the OVERVIEW page has been refreshed to reflect the changes.
- The purged user has now been deselected from the SETTINGS > Users list and will not be included in future backups.
Remove a specific shared drive
CubeBackup for Google Workspace allows you to easily purge specific shared drives from your backup set. Please follow the detailed instructions appropriate for your operating system.
Find the ID of shared drive in the URL of the shared drive's Restore page.
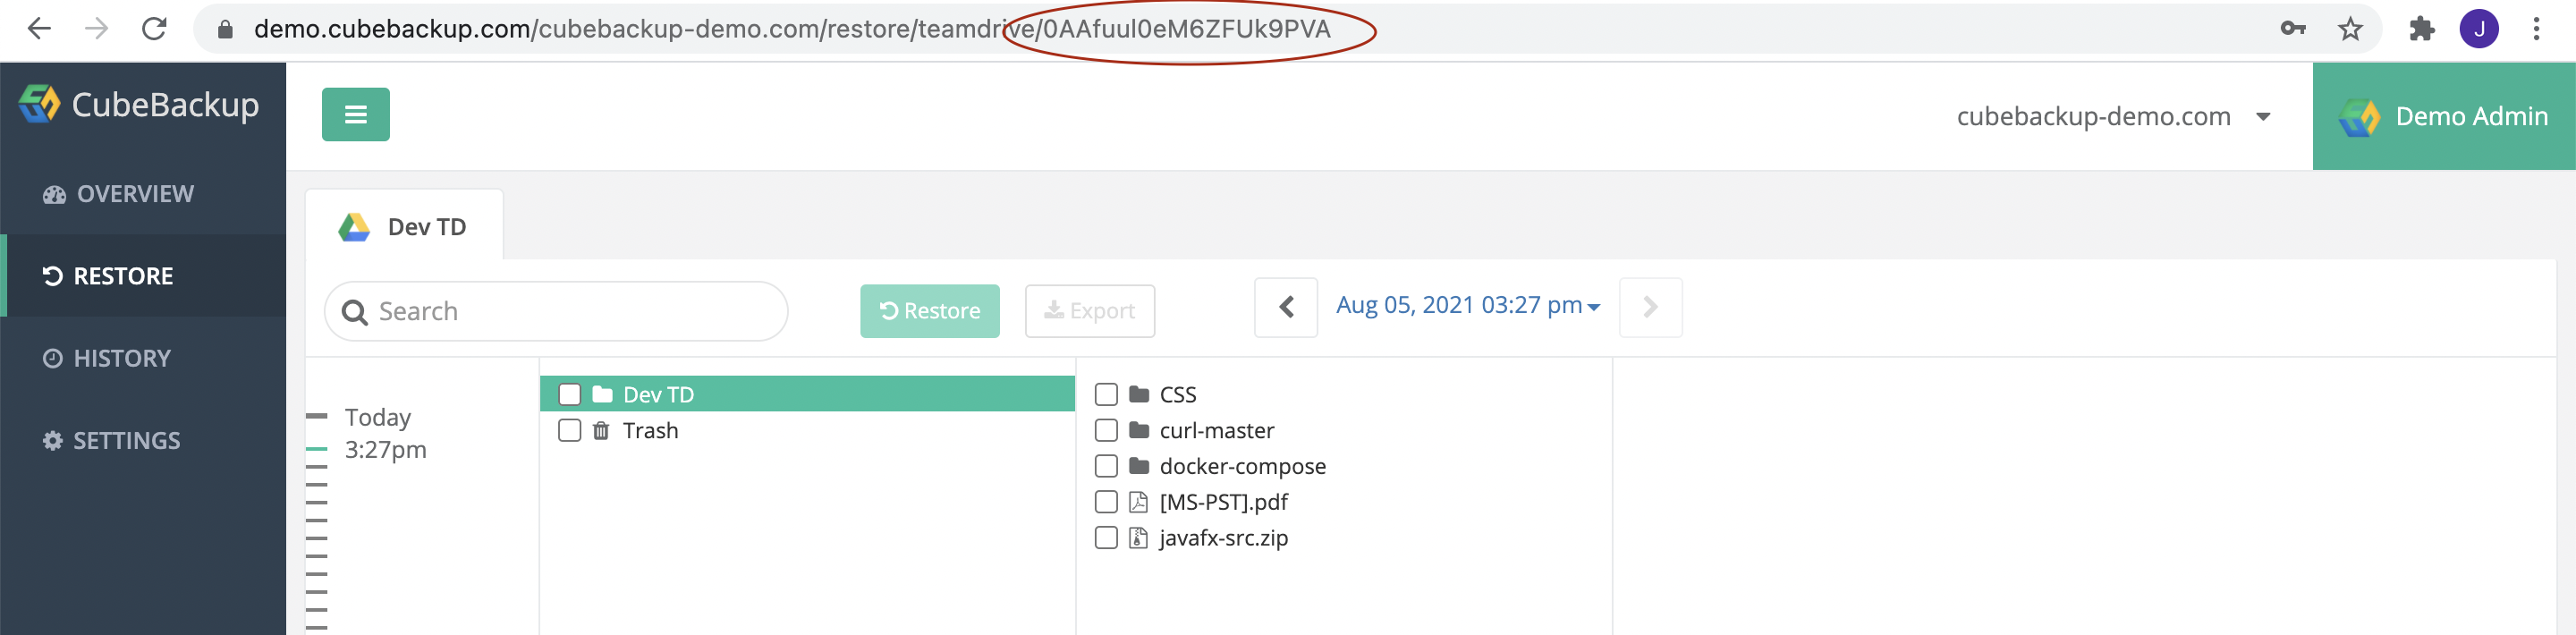
Note: Please write down the Shared Drive ID or save it in a text file. Later, the backup service will be stopped, and this page will be unavailable.
Log in to the backup server.
Be sure to stop the CubeBackup service before running this command:
Open a Command Prompt or Windows Powershell as Administrator and run the following command:"C:\Program Files\CubeBackup4\bin\cbsrv.exe" stop # in Command Prompt
& "C:\Program Files\CubeBackup4\bin\cbsrv.exe" stop # in Windows Powershell
Open a Windows Command Prompt or Powershell using an Administrator account. Run the cbackup purgeSharedDrive command in the <installation directory>\bin folder, and when prompted, double-check that this is the correct drive to be deleted. Type "yes" to purge all backup data for that specific drive.
"C:\Program Files\CubeBackup4\bin\cbackup.exe" purgeSharedDrive <shared_drive_id>Note:
(1) If the shared drive has already been deleted in Google Workspace, you can choose to also remove it from the shared drive list in CubeBackup. This will completely delete the shared drive so it will no longer appear in the CubeBackup web console.
(2) To remove multiple Shared drives at the same time, you can create a batch file that includes the following command for each Shared drive to be removed:echo yes | "C:\Program Files\CubeBackup4\bin\cbackup.exe" purgeSharedDrive <shared_drive_id>After running this command, you will need to start the CubeBackup service:
Open a Command Prompt or Windows Powershell as Administrator and run the following command:"C:\Program Files\CubeBackup4\bin\cbsrv.exe" start # in Command Prompt
& "C:\Program Files\CubeBackup4\bin\cbsrv.exe" start # in Windows Powershell
Now you can log into the CubeBackup console and see that:
- No files are listed under the shared drive on the RESTORE page.
- The statistical data on the OVERVIEW page has been refreshed to reflect the changes.
- The purged shared drive has now been deselected from the SETTINGS > Shared drives list and will not be included in future backups.
Find the ID of shared drive in the URL of the shared drive's Restore page.
Note: Please write down the Shared Drive ID or save it in a text file. Later, the backup service will be stopped, and this page will be unavailable.
SSH into the backup server.
Before running this command, be sure to stop the CubeBackup service:
sudo /opt/cubebackup/bin/cbsrv stopRun the cbackup purgeSharedDrive command to purge all backup data for the specific shared drive.
sudo -u cbuser /opt/cubebackup/bin/cbackup purgeSharedDrive <shared_drive_id>Note:
(1) This command requires special privileges and must be run by the cbuser account.
(2) If the shared drive has already been deleted in Google Workspace, you can choose to also remove it from the shared drive list in CubeBackup. This will completely delete the shared drive so it will no longer appear in the CubeBackup web console. (3) To remove multiple Shared drives at the same time, you can create a bash script that includes the following command for each Shared drive to be removed:yes | sudo -u cbuser /opt/cubebackup/bin/cbackup purgeSharedDrive <shared_drive_id>After running this command, you will need to start the CubeBackup service.
sudo /opt/cubebackup/bin/cbsrv startNow you can log into the CubeBackup console and see that:
- No files are listed under the shared drive on the RESTORE page.
- The statistical data on the OVERVIEW page has been refreshed to reflect the changes.
- The purged shared drive has now been deselected from the SETTINGS > Shared drives list and will not be included in future backups.
Find the ID of shared drive in the URL of the shared drive's Restore page.
Note: Please write down the Shared Drive ID or save it in a text file. Later, the CubeBackup web console will be unavailable during maintenance mode.
Find the container id for CubeBackup:
docker ps -aSwitch to maintenance mode by running the following command:
docker exec <container_name_or_id> touch /cubebackup_maintenance && docker restart <container_name_or_id>Open the bash shell of the container:
docker exec -it <container_name_or_id> bashRun the cbackup purgeSharedDrive command in the docker container.
sudo -u cbuser /opt/cubebackup/bin/cbackup purgeSharedDrive <shared_drive_id>When prompted, type "yes" to confirm, and CubeBackup will delete the backup data for the specified shared drive. Depending on the size of the shared drive's data, this process may take quite a while.
Note: If the user has already been deleted in Google Workspace, you can choose to also remove it from the user list in CubeBackup. This will completely delete the user so it will no longer appear in the CubeBackup web console.
After the cbackup purgeSharedDrive command has successfully completed, type exit to exit the container and run the following command to quit maintenance mode:
docker exec <container_name_or_id> rm /cubebackup_maintenance && docker restart <container_name_or_id>Now you can log into the CubeBackup console and see that:
- No files are listed under the shared drive on the RESTORE page.
- The statistical data on the OVERVIEW page has been refreshed to reflect the changes.
- The purged shared drive has now been deselected from the SETTINGS > Shared drives list and will not be included in future backups.