How can end users recover their own Google Workspace data through Google OAuth Login?
CubeBackup administrators/operators can backup or restore data for any users in the Google Workspace domain. However, it is often advantageous, especially in large organizations, to allow end users to individually find and recover Google Workspace files or emails by themselves.
Enable self-service recovery for Google Workspace with Google OAuth Login
Please follow the instructions below to enable Google OAuth login for all users in your Google Workspace domain, so that end users can restore their Google Workspace data without asking for the administrator:
Step 1. Assign a domain name to the CubeBackup server
Accessing the CubeBackup for Google Workspace web console via a domain name (not the IP address) is required for Google OAuth login. In most cases, you can assign a subdomain name for the CubeBackup server/VM (e.g. backup.company-name.com).
To point a domain name (e.g. backup.company-name.com) to your CubeBackup server, you need to add an "A" record in the DNS provider's console to connect the domain name to the IP address of your CubeBackup server.
Tips:
You can find more information about "A" records at support.google.com/a/answer/2576578/.
To change the DNS settings of your domain, you need to sign into the console of your DNS service provider, such as GoDaddy, Namecheap, or Google Domains. If you do not know the DNS service provider of your domain, or if you do not have credentials/permissions to log into the DNS console, please consult your network administrator.
Step 2. Enable HTTPS/SSL for the CubeBackup web console
After assigning a domain name for the IP address of the CubeBackup server, please enable HTTPS/SSL for your CubeBackup web console.
If you are currently using a reverse proxy for your CubeBackup service and already have HTTPS connections established, please skip directly to Step 3.
HTTPS/SSL is also natively supported in CubeBackup and is easy to activate for the web console. You can visit How to enable HTTPS for CubeBackup for detailed instructions.
Step 3. Create OAuth client ID
Log in to Google Cloud Platform using the same Google account which was used to create the Google Service account in the initial configuration.
Make sure that the project created for the Google Service account is the active project in the Google Cloud Platform.

Before creating an OAuth client, Google requires you to register your CubeBackup instance as a web application in this GCP project to continue using the Google OAuth service:

Please note that the application will only be displayed for the end users on the first login, and they only need to share their email address with the CubeBackup service before accessing their own backup data.
- From the navigation menu, select APIs & Services > OAuth consent screen.
- Choose the appropriate User Type for your CubeBackup application. If this project is located in the same Google Workspace domain that is being backed up, please select Internal for better security. Otherwise, for admins who manage multiple Google Workspaces on one CubeBackup instance, please select External.
- On the App information page, specify the App name to be displayed on the consent screen. Then enter the User support email and Developer contact information to receive future updates from Google. Click SAVE AND CONTINUE.
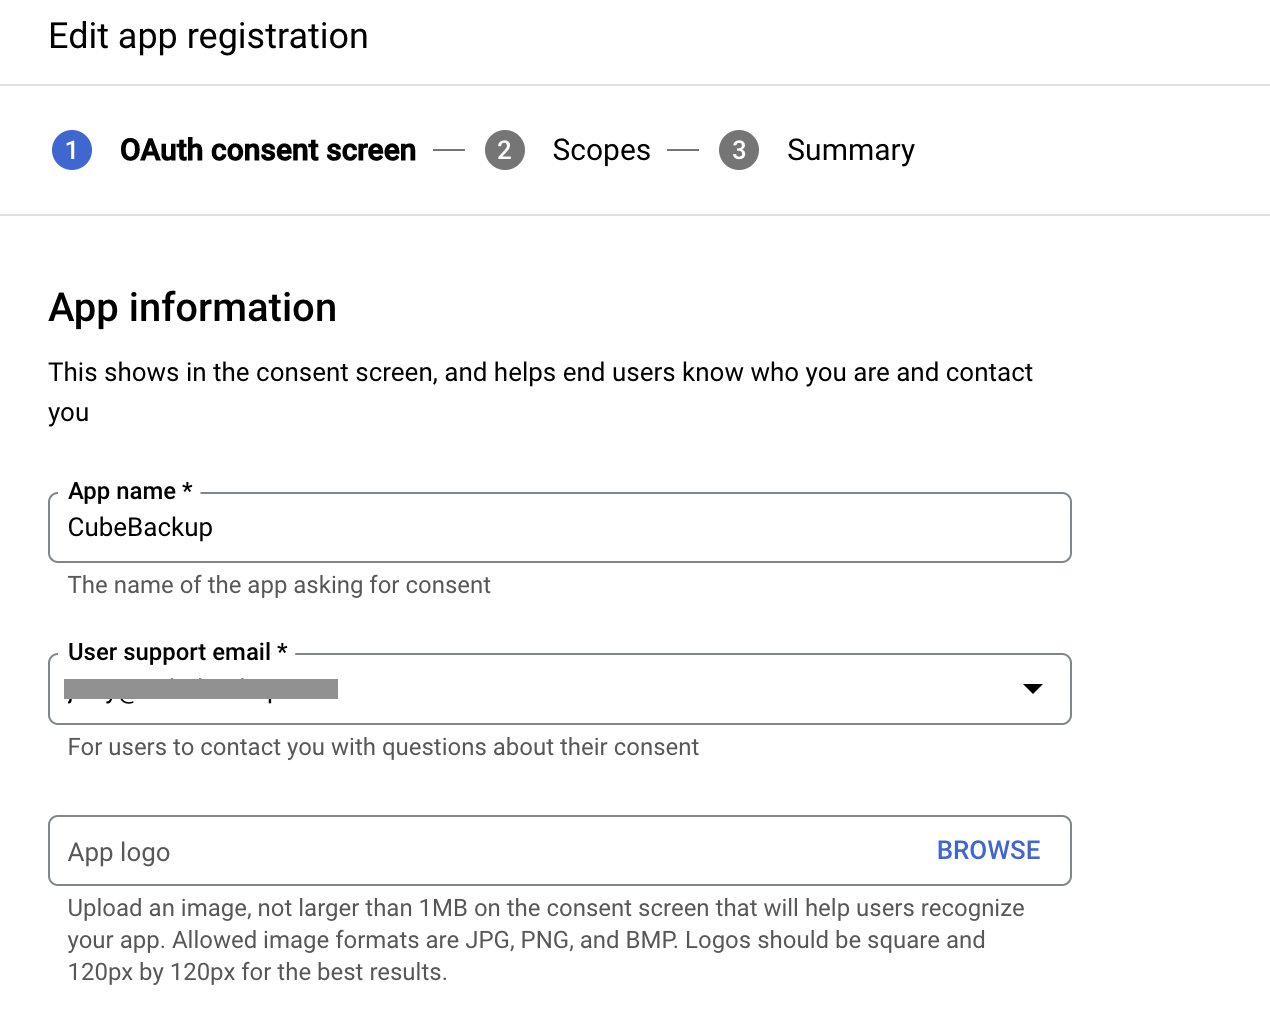
- Click SAVE AND CONTINUE directly on the Scopes page. CubeBackup does not require the end user to authorize any scopes for the application.
- Double-check the information on the Summary page, and click BACK TO DASHBOARD.
Now you can go ahead and create the OAuth client for your CubeBackup instance.
- Select Credentials from the left panel.
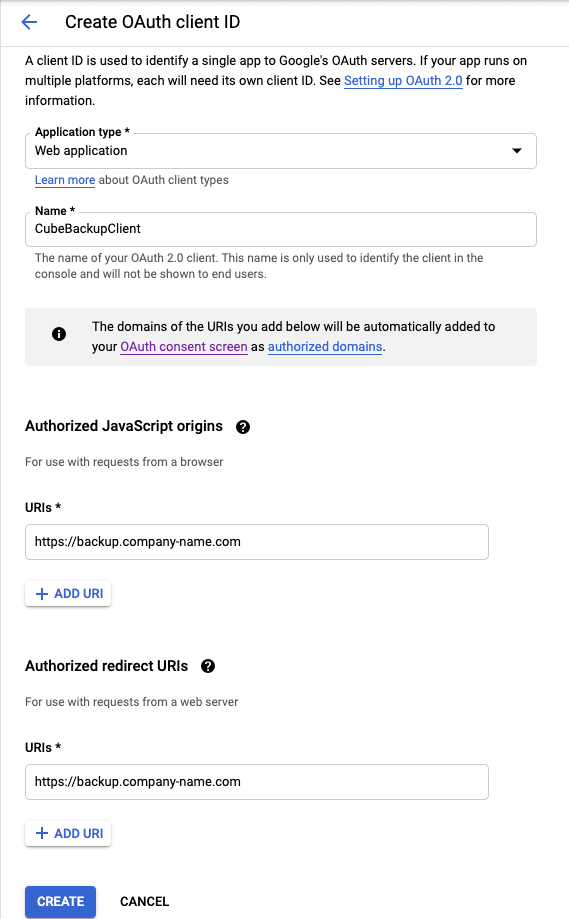
- In the Credentials page, click +CREATE CREDENTIALS > OAuth client ID.
- Select Web application from the Application type dropbox, then enter a name (e.g. CubeBackupClient) in the Name text box.
- Click +ADD URI in the Authorized JavaScript origins section, and input the domain URI of the CubeBackup server, such as https://backup.company-name.com.
- Add the same URI in the Authorized redirect URIs section.
- Click CREATE.
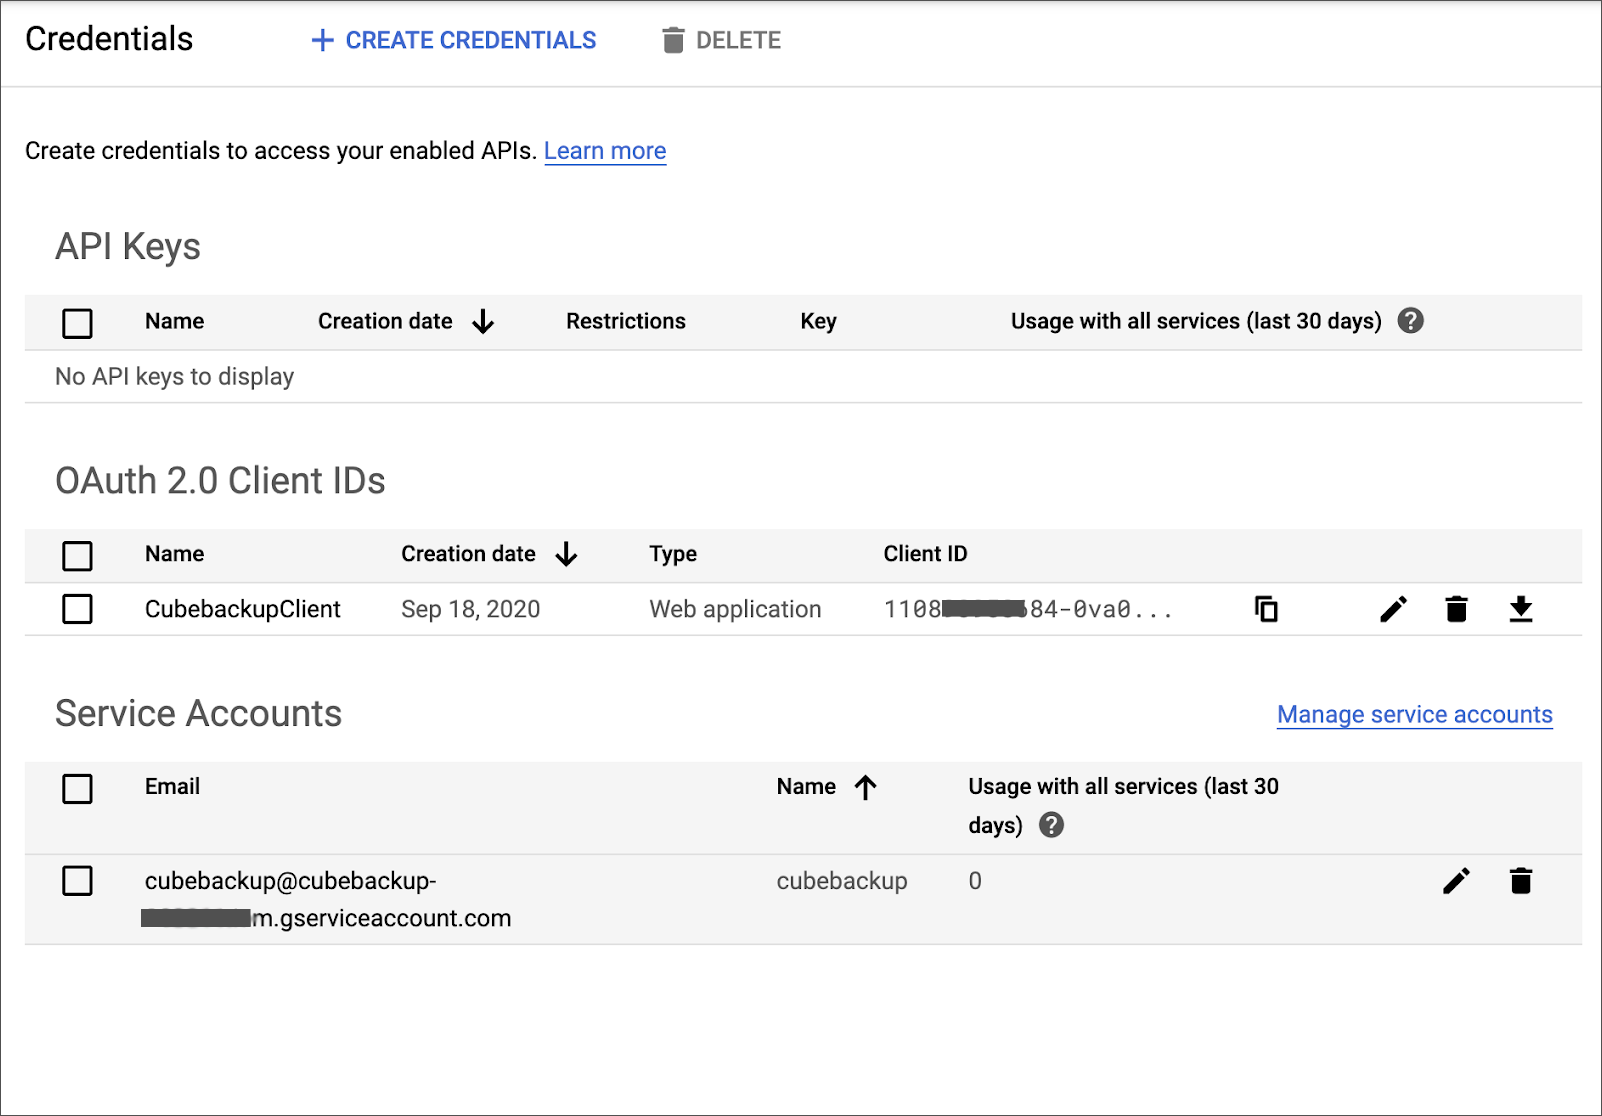
- In the OAuth client created dialog that pops up, copy the value of Your Client ID and keep it for the next step.
Tip: If you closed dialog pop-up without copying the OAuth client ID, don't worry, the OAuth client ID can always be found on the APIs & Services > Credentials page.
After the OAuth Client has been created, you should see at least one "OAuth 2.0 Client ID" and one "Service Account" in the Credentials page.
Step 4. Add the created OAuth Client ID to the CubeBackup configuration file
- Log (or SSH) into your backup server.
Open the configuration file config.toml using a text editor.
Note:
Starting with version 4.7, the configuration file is located at <installation directory>/etc/config.toml for fresh installations of CubeBackup. For installations upgraded through the console, or versions prior to 4.7, the configuration file is still located at <installation directory>/bin/config.toml.
On Windows, the installation directory is located at C:\Program Files\CubeBackup4 by default.
On Linux, the installation directory is located at /opt/cubebackup by default.Find the [Web] section and add the following line:
GoogleOAuthClientId = "Your OAuth Client ID"Here is an example of the [Web] section in the configuration file:
[Web]
Bind = ":80"
HTTPSEnabled = true
GoogleOAuthClientId = "110890958684-0va09v8s4qa8gicn3mijbpucb1bpf3lc.apps.googleusercontent.com"
Save the changes. Then return to and refresh the CubeBackup login page to confirm that the configuration has been applied correctly.
Step 5. Share the domain URL of the CubeBackup server to others
Now you can let everyone know the domain URL of the CubeBackup server, so that end users can use their own Google accounts to log in to the CubeBackup for Google Workspace web console, where they can view their backup files and emails, or even perform a self-service recovery on their Google Workspace data if necessary.
For detailed instructions, please refer to Basic operation guide for Google OAuth end users in CubeBackup.
NOTE:
1. Please complete the first few backup cycles of your Google Workspace domain before notifying all users of the domain address of the CubeBackup server. Otherwise, there will be no backup data for the users to see.
2. The OAuth login page is not visible for Internet Explorer users.